Orchids are flowers belonging to the Orchidaceae family, and these are found in over 25000 varieties and 1000 genera. Orchids are attractive flowering plants that offer an alluring sight to gardens, patios, or backyards.
If you have a feeling that orchids are difficult to grow, you are highly wrong. You can see the stunning flowers blooming under proper care and growing conditions. The flowers stay fresh and beautiful for months!
Orchids have elegant necks and stunning petals that fit best in the traditional forest habitat and thrives in the home environment as well.
However, it is crucial to understand how to repot orchids to maintain their healthy growth and magical appearance. Repotting promotes protection against root rot or overcrowding.
Here’s everything you need to know about repotting orchids – easy steps to follow, the right potting mix, and the materials required.
How to repot orchids?
Before getting started with repotting orchids, you must know when is the right time to repot the flowering plant. Look out for signs like:
Tightly tangled roots: Phalaenopsis orchids normally have loosely tangled roots. When this happens, know that it’s time to repot your orchids. Give the plant some breathing space by keeping it in a larger pot with fresh and healthy potting soil.
Roots turn soft and brown: In case you wait longer to repot the orchids, the roots will start holding more water, and start appearing brown and soft. You must use fresh potting mix for the plant to keep it healthy and happy.
Been a while since the last repotting: Orchids require fresh potting mix each year. So, if you have not repotted the plant for a year or more, do it at the earliest. It’s already time!
On-time repotting orchids, helps them intake the best nutrients and promotes good air circulation. Unreplaced soil may retain more water, resulting in root rot and turning the plant vulnerable to fungal diseases.
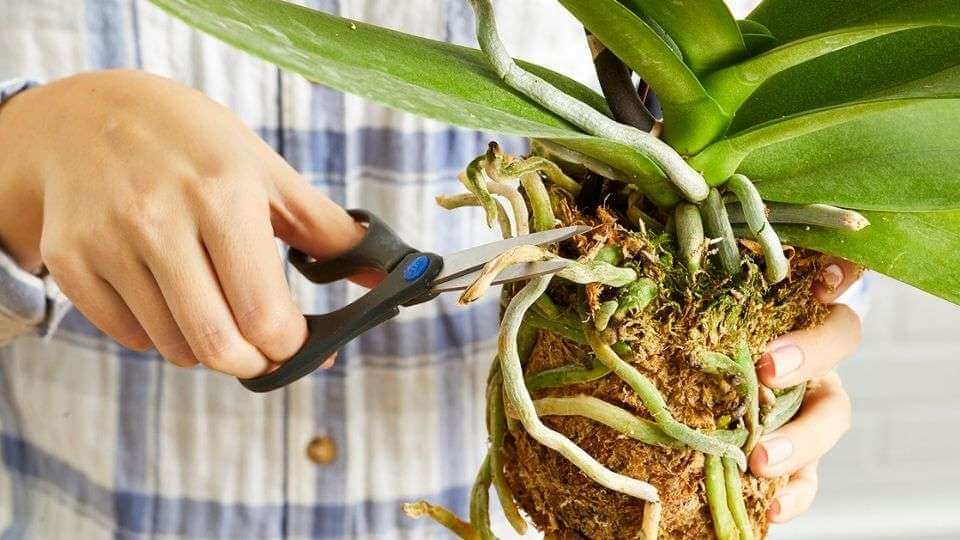
Materials required for repotting orchids
When you are sure that it’s the right time to repot the orchid plant, gather all these materials for the process:
- A bowl to soak orchid in tepid water (to make the roots flexible).
- Old newspapers to lay in the repotting area.
- Sterilized sharp pruning shears, clean scissors. You can use a butane torch or rubbing alcohol to sterilize the scissors. Pass the shears’ end through the flame.
- Garden gloves
- Wastebasket to collect old potting soil
- New pot for orchid
- New potting medium
- Additives for the potting mix
- Chopsticks for filling in the air voids
- Rhizome clip to secure the orchid
- Pencil and label
- Paper towels or cloth to cleanup
Choosing the right potting medium
You need to keep a few things in mind while preparing or buying a potting mix for repotting orchids. The flowering plant is mostly used as houseplants and those belong to the epiphytic category. It means that orchids don’t thrive well in soil.
Check out how you can prepare a perfect potting medium for your orchids:
- Most orchids grow fine in sphagnum moss, a bark or orchid bark mixture. You can try preparing a mixture using 4 parts of coconut husks or fir bark, 1 part perlite, and 1 part medium charcoal.
- When you are unsure of the particular type of orchid, the safest choice for most epiphytic orchid plants is packaged potting medium. You can find it at garden centres, nurseries, etc.
- For terrestrial orchids, you will require soil that retains water properly and is crumbly in texture. Your potting mix should have a high content of wood matter and perlite. You can contact your local nursery for the right mix.
Steps on how to repot orchids
Start by unpotting orchids
- To unpot, it is significant to have pliable roots. For this, soak it for 5 minutes in water.
- Now, take the plant out of the pot easily.
- Orchid roots may cling to clay. You may need to break the clay or plastic pots in case of a tenacious clinging of roots.
- Use a disposable razor to detach the roots.
- It is fine if some of the roots remain attached to the pot.
Remove the old potting medium
- Make sure not to use any of the old potting mix while repotting orchids. Using a new potting medium will offer the orchids a great start for regrowth without fertilizer salt buildup.
- Take away the old potting mix and pick the remains off the roots.
- Orchids having thinner and finer roots are a bit more tricky to tease away the potting medium off them as compared to doing the job on the thick roots of the orchid.
- Cutaway the rot, remove dead leaves and rotten roots
- Make sure to inspect the pseudobulbs, cut off the lifeless brown ones and leave back the greens, even if they are leafless.
- Identifying dead roots are easy as they turn mushy and black. The healthy ones are firm, white or green.
- When you have taken away all the remains of the old potting medium from the roots, trimmed away the roots, rinse them with tepid tap water.
- In the case of repotting orchids with larger stems and leaves, you will have to divide the plant. It is one of the important steps included in how to repot orchids.
Divide the orchid plant
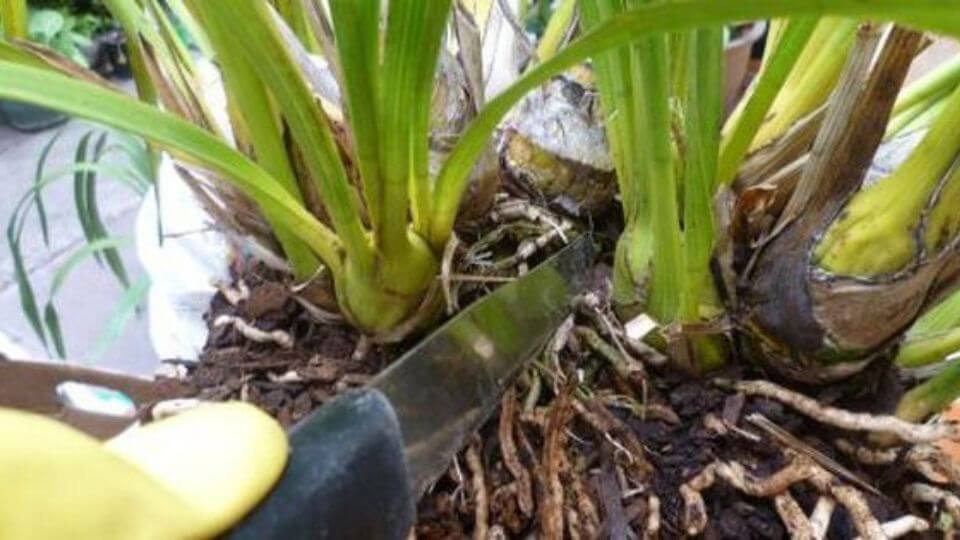
- Division of orchids largely depends on the type of plant you have got – the most commonly divided type is the sympodial orchid.
- These grow along a rhizome. When orchids grow inro a healthy and larger size having numerous pseudobulbs, they can be easily divided.
- Break the pseudobulbs apart into 4-5 clumps.
- Pot the separated clumps on different pots. You can even share or trade the divided orchids to expand your collection.
Note: Slipper orchids lack pseudobulbs, but they do grow like a rhizome and are sympodial.
Keep the orchid in the new pot
- Orienting the orchid well is essential depending on its growth habit.
- Before you place the orchid in the new pot, know its type well – monopodial or sympodial. Why? Because it will make a difference in the process!
- Monopodial orchids should be placed in the middle of the pot to make sure it continues to grow upright.
- Sympodial orchids are kept with the oldest growth by the edge of the pot.
- The new growth of sympodial orchids moves towards the middle area of the pot.
Work in the roots and put the potting mix
- Start working in the roots till you see the base of the plant reaches the top.
- Once you find the right orientation of your orchid plant, you can start with working in roots and adding the freshly prepared potting mix.
- Turn the pot in one direction with the plant in the opposite direction. This event promotes the roots to curl inside the pot.
- Keep adding the potting mix as you proceed.
- Pat and tamp the pot to fill in the air voids. You can also a chopstick for the job.
- Gently shake the pot while tapping to help the potting medium to settle well inside it.
- As the plant’s crown wishes to stay dry always, you must keep it above the potting medium.
- Similarly, the aerial roots should also remain in the air and out of the potting mix as they tend to grow out of the pot.
Note: Vanda orchids (monopodial orchids) are mostly kept in a wood-slatted basket with a coarse potting medium.
Secure the orchid
- When you repot the orchids, the roots will push up and emerge out of the pot.
- It looks bad and also the roots outside the pot dry out faster than the part secured inside the potting mix.
- In the case of sympodial orchids, you can use rhizome clips to keep the orchid to a decent potting height.
- With one end of the clip, snap down a side of the pot while using the other (long) end to secure the orchid in the right position.
- For monopodial orchids, pot them at an appropriate level with the base of the stem placed right above the potting medium. This is because they don’t grow along rhizomes.
Update the label
- The last step of repotting orchids requires you to label the potting date on the bottom of the pot. It will help you know the right time to repot the orchid next year.
Taking care of repotted orchids
You must take extra care of the repotted orchids such as Dendrobium. Here are a few things to keep in mind:
- Make sure you don’t disturb the roots when unpotting and repotting orchids. Keep the process as gentle as possible while you lift the orchid and set it in a larger pot with a newly prepared potting mix.
- In the case of touchy orchids like Dendrobium, you should use a premium potting mix to ensure there’s no frequent need of repotting them.
- For orchids that nurture well in the slatted cedar baskets, keep them in a larger basket without removing them from the smaller basket.
On major types of orchids

Monopodial orchids
When you buy an orchid plant from a nursery or grocery store, most likely it’s going to be a Phalaenopsis orchid. Also known as moth orchids, this is a type that grows from a single stem.
The leaves, roots, and flower stalk, all grow from this one stem. Some of the main examples of monopodial orchids are vanda, Angraecum and phalaenopsis orchids. Always place the monopodial orchids in the middle of the pot while potting.
Sympodial Orchids
Sympodial orchids, in contrast to monopodial orchids, grow horizontally along a rhizome. The oldest growth remains against the edge of the pot, whereas the newest growth moves towards the centre.
How to understand the difference between new and old growth? For a healthy plant, the newer growth of pseudobulbs will be larger than the oldest ones. This keeps happening until the orchids reach maturity.
There’s another way of tracking the growth habit of sympodial orchids is that paphiopedilums don’t have pseudobulbs. However, their flowers for the upcoming year grow from the latest leaves.
You should keep the newest growth towards the centre of your orchid pot and the oldest, close to the edge.
Special potting ideas for young orchids
- Young orchids grow faster than the matured orchid plants. You will require to keep repotting them more frequently.
- Just remove the young plant from the pot. You need not tease away the roots from the old potting medium.
- In the new pot, add the fresh and healthy potting mix at the bottom. Make sure to take a larger pot.
- While being careful, keep adding the potting mix to the sides of the pot till you see the orchid’s crown levelled with the top of the pot.
Conclusion
Orchid, an amazingly beautiful flowering plant, should undergo repotting frequently based on its type. If you got colorful blooms in your garden or on the patio, you must learn how to repot orchids, and follow the steps carefully for successful results.
You may also like to read
Propagating Hibiscus: Grow the Beautiful Plant in Your Garden



One thought on “How to Repot Orchids? A Step by Step Guide!”
I totally agree when you said that make sure you don’t disturb the roots when unpotting and repotting orchids. My mother has a flower garden at home. I will suggest to her to grow some rare orchid plants for a change. I will take your advice on where to find quality orchid plants.